http://www.peachpit.com/articles/printerfriendly/1930497
Sorting Your Photos Using Collections in Adobe Photoshop Lightroom 4
By Scott Kelby
Date: Aug 23, 2012
Scott Kelby introduces a sorting workflow that’s fast and efficient, and helps you get to the real goal of sorting, which is finding the best shots from your shoot—the “keepers”—the ones you’ll actually show your client, or add to your portfolio, or print. Sorting your images can be one of the most fun, or one of the most frustrating, parts of the editing process—it just depends on how you go about it. Personally, this is one of the parts I enjoy the most, but I have to admit that I enjoy it more now than I used to, and that’s mostly because I’ve come up with a workflow that’s fast and efficient, and helps me get to the real goal of sorting, which is finding the best shots from your shoot—the “keepers”—the ones you’ll actually show your client, or add to your portfolio, or print. Here’s how I do it:
Step Four:
So here’s how I go about the process: Once my photos have been imported into Lightroom, and they appear in the Library module’s Grid view, I double-click on the first photo to jump to Loupe view so I can get a closer look. I look at the photo, and if I think it’s one of the better shots from the shoot, I press the letter P to flag it as a Pick. If it’s so bad that I want to delete it, I press the letter X instead. If it’s just okay, I don’t do anything; I just move on to the next photo by pressing the Right Arrow key on my keyboard. If I make a mistake and mis-flag a photo (for example, if I accidentally mark a photo as a Reject when I didn’t mean to), I just press the letter U to unflag it. That’s it—that’s the process. You’ll be amazed at how quickly you can move through a few hundred photos and mark the keepers and rejects. But you’ve still got some other things to do once you’ve done this first essential part.
Step Five:
Once you’ve got your Picks and Rejects flagged, let’s get rid of the Rejects and delete them from your hard drive. Go under the Photo menu and choose Delete Rejected Photos. This displays just the photos you’ve marked as Rejects, and a dialog appears asking if you want to delete them from your disk or just remove them from Lightroom. I always choose Delete from Disk, because if they were bad enough for me to mark them as Rejects, why would I want to keep them? What could I possibly use them for? So, if you feel the same way, click the Delete from Disk button and it returns you to the Grid view, and the rest of your photos. (Note: Because we just imported the photos into Lightroom, and they’re not in a collection yet, it gives you the option to delete the images from the disk. Once they’re actually in a collection, doing this just removes the photos from the collection, and not from your hard disk.)
Step Six:
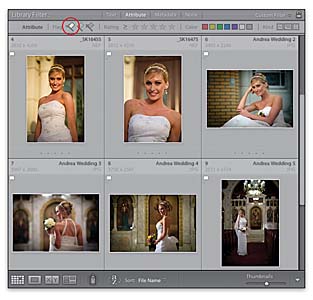
Now to see just your Picks, click on the word Attribute up in the Library Filter bar that appears at the top of the center Preview area (if you don’t see it, just press the \ [backslash] key on your keyboard), and a little Attribute bar pops down. Click on the white Picks flag (shown circled here), and now just your Picks are visible.
Tip: Use the Other Library Filter
You can also choose to see just your Picks, Rejects, or your unflagged photos from down on the top-right side of the Filmstrip. There’s a Library filter there too, but just for attributes like flags and star ratings, and some metadata.
Step Seven:
What I do next is put these Picks into a collection. Collections are the key organizational tool we use, not just here in the sorting phase, but throughout the Lightroom workflow. You can think of a collection as an album of your favorite photos from a shoot, and once you put your Picks into their own collection, you’ll always be just one click away from your keepers from the shoot. To get your Picks into a collection, press Command-A (PC: Ctrl-A) to select all the currently visible photos (your Picks), then go over to the Collections panel (in the left side Panels area), and click on the little + (plus sign) button on the right side of the panel header. A pop-up menu will appear, and from this menu, choose Create Collection (as shown here).
Step Eight:
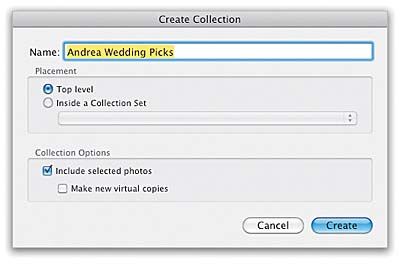
This brings up the Create Collection dialog you see here, where you type in a name for this collection, and below it you can make it a top level collection or assign it to a set (we haven’t talked about sets yet, or created any sets, or even admitted that they exist. So for now, leave this set to Top Level, but don’t worry, sets are coming soon enough). In the Collection Options section, you want your collection to include the photos you selected (your Picks) in the previous step, and because you made a selection first, this checkbox is already turned on for you. For now, leave the Make New Virtual Copies checkbox turned off, then click the Create button.
Step Nine:
Now you’ve got a collection of just your keepers from that shoot, and anytime you want to see these keepers, just go to the Collections panel and click on the collection named Andrea Wedding Picks (as seen here). Just in case you were wondering, collections don’t affect the actual photos on your computer—these are just “working collections” for our convenience—so we can delete photos from our collections and it doesn’t affect the real photos (they’re still in their folder on your computer, except for the Rejects we deleted earlier, before we created this collection).
NOTE
If you’re an Apple iPod, iPad, or iPhone owner, then you’re familiar with Apple’s iTunes software and how you create playlists of your favorite songs (like big hair bands of the ‘80s, or party music, or classic rock, etc.). When you remove a song from a playlist, it doesn’t delete it from your hard disk (or your main iTunes Music Library), it just removes it from that particular playlist, right? Well, you can think of collections in Lightroom as kind of the same thing, but instead of songs, they’re photos.
Step 10:
Now, from this point on, we’ll just be working with the photos in our collection. Out of the 298 bridal shots that were taken that day, only 18 of them were flagged as good shots, and that’s how many wound up in our Picks collection. But here are some questions: Are you going to print all 18 of these keepers? Are all 18 going in your portfolio, or are you going to email 18 shots of this one bridal shoot to the bride? Probably not, right? So, within our collection of keepers, there are some shots that really stand out—the best of the best, the ones you actually will want to email to the client, or print, or add to your portfolio. So, we need to refine our sorting process a little more to find our best shots from this group of keepers—our “Selects.”
Step 11:
At this stage, there are three ways to go about viewing your photos to narrow things down. You already know the first method, which is the whole Pick flag thing, and you can do that same process again here in your collection, but first you’ll need to remove the existing Pick flags (in previous versions of Lightroom, when you added photos to a collection, it automatically removed the flags, but in Lightroom 4, it remembers them). To remove them press Command-A (PC: Ctrl-A) to select all of the photos in your collection, then press the letter U on your keyboard to remove all the Pick flags, so we can add new ones. The second view that you might find helpful is called Survey view, and I use this view quite a bit when I have a number of shots that are very similar (like a number of shots of the same pose) and I’m trying to find the best ones from that group. You enter this view by first selecting the similar photos, as seen here (click on one, then press-and-hold the Command [PC: Ctrl] key and click on the others).
Step 12:
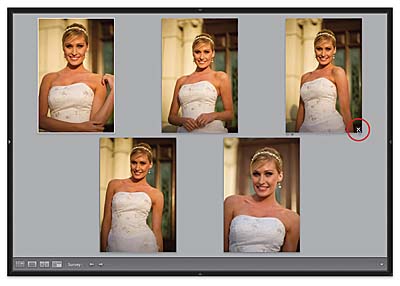
Now press the letter N to jump to Survey view (I don’t know which is worse, this view being named Survey or using the letter N as its shortcut. Don’t get me started). This puts your selected photos all onscreen, side by side, so you can easily compare them (as shown here). Also, anytime I enter this Survey view, I immediately press Shift-Tab to hide all the panels, which makes the photos as large as possible on my screen.
Tip: Try Lights Out Mode
Survey view is a perfect place to use the Lights Out feature that blacks out everything but your photos. Just press the letter L on your keyboard twice to enter Lights Out mode and you’ll see what I mean. When you’re done in Lights Out, to return to the regular view, just press L again.
Step 13:
Now that my photos are displayed in Survey view, I start the process of elimination: I look for the weakest photo of the bunch and get rid of it first, then the next weakest, and the next, until I’m left with just the best two or three shots of that pose. To eliminate a photo, just move your cursor over the photo you want to remove from contention (the weakest photo of the bunch) and click on the small X that appears in the bottom-right corner of the image (as seen here), and it’s hidden from view. It doesn’t remove the photo from your collection, it just hides it to help with your process of elimination. Here, I removed one photo and the others automatically readjusted to fill in the free space. As you continue to eliminate images, the remaining images get larger and larger as they expand to take up the free space.
Tip: Changing Your Survey Order
While you’re in Survey view, you can change the order of the images displayed onscreen by just dragging-and-dropping them into the order you want.
Step 14:
Once you narrow things down to just the ones you want to keep of this pose, press G to return to the thumbnail Grid view and those photos that were left onscreen will automatically be the only ones selected (see the three final photos I wound up leaving onscreen—they’re the only ones selected). Now, just press the letter P to flag those as Picks. Once they’re flagged, press Command-D (PC: Ctrl-D) to deselect those photos, then go and select another group of photos that are similar, press N to jump to Survey view, and start the process of elimination on that group. You can do this as many times as you need, until you’ve got the best shots from each set of similar shots or poses tagged as Picks.
NOTE
Remember, when you first made your collection from flagged Picks, we selected all the photos and removed the Pick flags by pressing the letter U. That’s why you’re able to use them again here.
Step 15:
Now that you’ve gone through and marked the very best shots from your Picks collection, let’s put just those “best of the best” in their own separate collection (this will make more sense in just a minute). At the top of the center Preview area, in the Library Filter bar, click on Attribute, and when the Attribute bar pops down, click on the white Picks flag to display just the Picks from your Picks collection (as seen here).
Step 16:
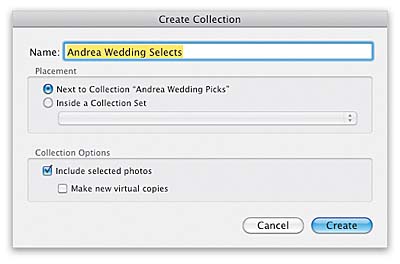
Now press Command-A (PC: Ctrl-A) to select all the Picks displayed onscreen, and then press Command-N (PC: Ctrl-N), which is the keyboard shortcut for New Collection. This brings up the Create Collection dialog. Here’s a tip: name this collection by starting with the name of your keepers collection, then add the word “Selects” (so in my case, I would name my new collection “Andrea Wedding Selects”). Collections appear listed in alphabetical order, so if you start with the same names, both collections will wind up together, which makes things easier for you in the next step (besides, you can always change the name later if you like).
Step 17:
Just to recap, now you have two collections: one with your keepers from the shoot (the Picks), and a Selects collection with only the very best images from the shoot. When you look in the Collections panel, you’ll see your keepers collection with the Selects one right below (as shown here).
Note: We still have one more method to cover for narrowing things down, but just so you know, after that you’ll learn how to use Collection Sets, which make things easy when you have multiple collections from the same shoot—like we do here with a Picks collection and Selects collection.
Step 18:
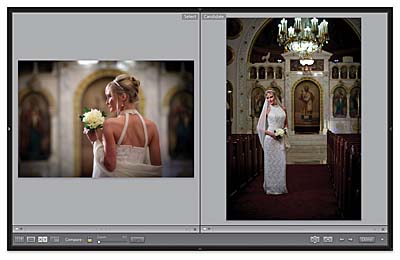
There’s a third view you can use to view your images that can help you in situations where you need to find the one single, solitary, best shot from a shoot (for example, let’s say you want to post one single shot from your bridal shoot on your studio’s blog, so you need to find that one perfect shot to run with your post). That’s when you use Compare view—it’s designed to let you go through your photos and find that one, single, best shot. Here’s how it works: First, select the first two photos in your Selects collection (click on the first photo, then Command-click [PC: Ctrl-click] on the second image, so they’re both selected). Now, press the letter C to enter Compare view, where the two photos will appear side by side (as shown here), then press Shift-Tab to hide the panels and make the photos as large as possible. Also, you can enter Lights Out mode now, if you like (press the letter L twice).
Step 19:
So, here’s how this works, and this is a battle where only one photo can win: On the left is the current champion (called the Select), and on the right is the contender (called the Candidate). All you have to do is look at both photos, and then decide if the photo on the right is better than the photo on the left (in other words, does the photo on the right “beat the current champ?”). If it doesn’t, then press the Right Arrow key on your keyboard and the next photo in your collection (the new contender) appears on the right to challenge the current champ on the left (as seen here, where a new photo has appeared on the right side).
Step 20:
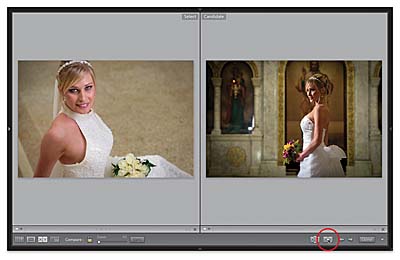
If you press the Right Arrow key to bring up a new Candidate, and this new photo on the right actually does look better than the Select photo on the left, then click the Make Select button (the X|Y button with a single arrow, on the right side of the toolbar below the center Preview area, shown circled here in red). This makes the Candidate image become the Select image (it moves to the left side), and the battle starts again. So, to recap the process: You select two photos and press C to enter Compare view, then ask yourself the question, “Is the photo on the right better than the one on the left?” If it’s not better, press the Right Arrow key on your keyboard. If it is better, click the Make Select button and continue the process. Once you’ve gone through all the photos in your Selects collection, whichever photo remains on the left (as the Select photo) is the best image from the shoot. When you’re done, click the Done button on the right side of the toolbar.
Step 21:
Although I always use the Arrow keys on my keyboard to “do battle” in Compare view, you can also use the Previous and Next buttons in the toolbar. To the left of the Make Select button is the Swap button, which just swaps the two photos (making the Candidate the Select, and vice versa), but I haven’t found a good reason to use this Swap button, and just stick to the Make Select button. So, which of the three views do you use when? Here’s what I do: (1) the Loupe view is my main view when making Picks, (2) I use Survey view only when comparing a number of shots of a similar pose or scene, and (3) I use Compare view when I’m trying to find a single “best” image.
 Figure 22a If you don’t want to use the Left and Right Arrow keys on your keyboard, you can use the Previous and Next buttons in the toolbar to bring up the next Candidate or return to the previous one
 Figure 22b The Swap button lets you swap the Candidate and Select images. I honestly haven’t found a lot of use for this button
 Figure 22c Besides pressing C to enter Compare view, you can also click the Compare View button. The button to the right of it is the button to enter Survey view
 Figure 22d When you’re finished using Compare view, either click the Done button to go to Loupe view, or click the Compare View button to return to the regular Grid view
Step 22:
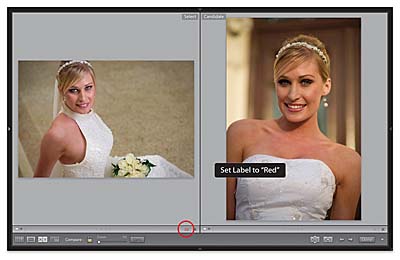
One last thing about Compare view: once I’ve determined which photo is the single best photo from the shoot (which should be the image on the left side when I get through all the images in my Selects collection—what I call “the last photo standing”), I don’t make a whole new Selects collection for just this one photo. Instead, I mark this one photo on the left as the winner by pressing the number 6 on my keyboard. This assigns a Red label to this photo (as shown here).
Step 23:
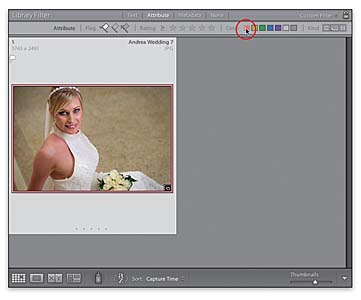
Now anytime I want to find the single best photo out of this shoot, I can go to the Library module’s Grid view (G), click on Attribute in the Library Filter bar, and then in the Attribute bar below it, I can click the Red label (as shown circled here), and bang—there’s my “Best of Show.” So, in this tutorial, you’ve just learned a key part of the organization process—creating collections—and using collections puts both “your keepers” and your very best photos from each shoot just one click away. Next, we’ll look at how to organize related shoots that will have multiple collections (like a wedding or vacation).
