How to Create and Publish Your Own Python Package
Prerequisites
Before we start, ensure you have:
- Basic knowledge of Python programming.
- Python 3.6 or higher installed.
- pip installed.
Step 1: Set Up Your Project Structure
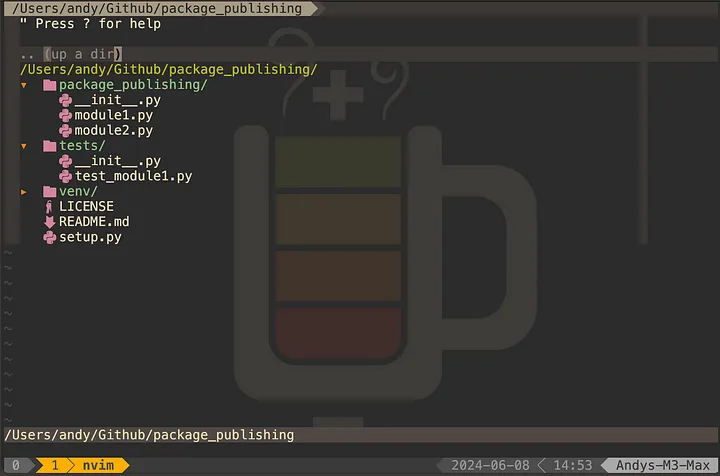
A well-organized project structure is crucial, as the intention here is that this is a package that will out live individual projects and be maintained for many years, potentially by multiple teams. You need to ensure you have tests, and clear documentation. Here’s a basic template:
Step 2: Writing Your Package Code
Obviously your package isn’t going to be much use if it doesn’t do anything. I’ve created two basic modules. The first can do addition and subtraction, while the second can do multiplication and division.
Step 3: Creating __init__.py
The __init__.py file makes Python treat the directory as a package. Create package_publishing/__init__.py:
# package_publishing/__init__.py

from .module1 import add, subtract
from .module2 import multiply, divide
Step 4: Writing Tests
Testing ensures your package works as expected. Create tests/test_module1.py:
# tests/test_module1.py

import unittest
from package_publishing import add, subtract

class TestModule1(unittest.TestCase):

    def test_add(self):
        self.assertEqual(add(1, 2), 3)
        self.assertEqual(add(-1, 1), 0)

    def test_subtract(self):
        self.assertEqual(subtract(2, 1), 1)
        self.assertEqual(subtract(2, 3), -1)

if __name__ == "__main__":
    unittest.main()
Step 5: Creating setup.py
Note: setup.py is obsolete. Use project.toml instead. https://packaging.python.org/en/latest/tutorials/packaging-projects/
The setup.py file is essential for packaging. Create setup.py:
from setuptools import setup, find_packages

setup(
    name="package_publishing",
    version="0.1",
    packages=find_packages(),
    install_requires=[],
    author="Andy",
    author_email="andy@dont_spam_me.co",
    description="A simple example private package",
    long_description=open("README.md").read(),
    long_description_content_type="text/markdown",
    url="https://github.com/nydasco/package_publishing",
    classifiers=[
        "Programming Language :: Python :: 3",
        "License :: OSI Approved :: MIT License",
        "Operating System :: OS Independent",
    ],
    python_requires='>=3.6',
)
Step 6: Writing the README and LICENSE
Your README.md should provide an overview of your package:
# My Package

A simple example package.

## Installation

```bash
pip install package_publishing
Step 7: Building and Distributing Your Package
To build your package, run:
pip install wheel
python setup.py sdist bdist_wheel
This creates a dist/ directory with the distribution files.
Step 8. Initialize Git and Push to GitHub
In your project directory, run the following commands to initialize a Git repository, add your files, commit them, and push to GitHub:
git init
git add .
git commit -m "Initial commit"
git remote add origin https://github.com/yourusername/package_publishing.git
git push -u origin main
Replace yourusername with your GitHub username and package_publishing with your repository name.
Using Your Package
Now that you’ve published your package, you’ll want to use it. First thing to do if your code sits in a private repository is to create yourself a personal access token. Follow these steps to generate a PAT:
- Go to GitHub Settings.
- Select “Developer settings” > “Personal access tokens”.
- Select ‘Tokens (classic)”
- Click “Generate new token” > “Generate new token (classic)”
- Select the scopes you need (e.g., repo), and give the token a Note
- Click “Generate token” and copy the token.
You can now use this token to install your package:
pip install git+https://<your-token>@github.com/yourusername/package_publishing.git
Replace <your-token> with your PAT, yourusername with your GitHub username, and package_publishing with your repository name.
